|Terjemahan Light Novel Bahasa Indonesia| Tutorial| Tips & Trick| Cryptocurency| Info Anime| Recomendasi Anime| Sinopsis Anime| OST & Lirik Anime|Game Android|Download|Blockchain|ICO|

Tampilkan postingan dengan label Tutorial Blog. Tampilkan semua postingan

How to Create Info Widget, Tips, And Warning Cool on Blog New

Still meet again with my admin Godscoin, who certainly always accompany with the latest articles, trusted, and unique. I will today give a tutorial on "How to make Info Block Box, cool Tips" yaps, for those who already can not wait to see the following tutorial:

Observe and understand step by step;

1. Please login to blogger first buddy> Template Menu> Edit HTML
2. Press CTRL + F> find this code ]]> </ b: skin> or </ style>
** Put the CSS code below just above the code ]]> </ b: skin> or </ style>

.info, .tips, .warning { line-height: 22px; min-height: 38px; padding-left: 10px; padding: 10px 12px 12px 68px; margin: 5px 0; } .info { background: #e0e5eb url('https://blogger.googleusercontent.com/img/b/R29vZ2xl/AVvXsEhvf_02vr9673tiHzWgGz33ONXDZo1JETucQKPu2rMHugoxhG69BiKzLL-3QeK9-5uSm8d9mJjZSLO-9_j1CnElsW-WY27ntyDAsTHByK3dM0kZQjH_fJZGns3YoyqVr9060P41RMyS72E/s1600/info.png') no-repeat 12px 8px; color: #222 } .tips { background: #7CADDE url('https://blogger.googleusercontent.com/img/b/R29vZ2xl/AVvXsEgKDk0sB98FnrSVlii9vbYHbH2PN7IMuymLyI4r9KtLMJDl8_VCBAKmS4IEi6ox0HT-8zL4hR878KiRzPOb9x28iTPpySwpXY0K1wknliX_KX2GC_jbEIqBgdTiAkm8Y2daPaDUEASIyU4/s1600/tips.png') no-repeat 12px 8px; color: #fff; } .warning { background: #db6161 url('https://blogger.googleusercontent.com/img/b/R29vZ2xl/AVvXsEhQtBA2bZWwvj9UfOht1pSnBBBip1r88VuaO3g2wXj0GwdDD2cAZWBY1fSvHv2RA1Ipro7RoocRmwttUOADkGogeibuKJVoyuVgkBxveQF7IA1zgFV8ZNwNhFXLPbjbPPqCxfjvbAGF30g/s1600/warning.png') no-repeat 12px 8px; color: #fff; }

3. If the CSS code is already installed, now go to Step three to install the Div code from Info, Tips and Warnings in our article.

** Code block Info box, please copy paste the code below in your HTML Mode article;
<div class = "info">
This is a block containing info / notes, please write here any word </ div>


** Code block block Tips, please copy paste the code below in your HTML Mode article;
<div class="tips">
This is a block containing Tips, please write here any word
</div> 
** Code block block Tips, please copy paste the code below in your HTML Mode article; 
<div class = "warning">
This is a block containing warning / ban, please write here any word
</ div>


Actually we can install block code tips, info and warning using <DIV> but with tag <P> also can. basically we just change the code <DIV class> to <P class>.

See sample code below;

<p class = "tips">
This is a block containing Tips, please write here any word
</ p>


And last try check on your blog article ,, cool it looks? if you are satisfied with the tutorial please express directly in the comment box.

Probably enough for today's meeting, if my friend finds it difficult to do this tutorial, please ask Ke Mas Yoga directly ,,
If there is a mistake or similarity in the writing of the word please forgive ,,,

See you and wait for the next update, and bye-bye.
Cara Merubah Ukuran Halaman Template Blogger Terbaru

Template blog hasil download, biasanya ukuran halaman posting, sidebar,dll seringkali tidak sesuai dengan keinginan kita. Tapi jangan khawatir pada kesempatan ini kita akan membahas cara mengubah ukuran halaman blog. biasanya kita perlu merubah template kita untuk keperluan blog atau website kita. Misalnya, sekarang google adsense meluncurkan unit iklan baru dengan ukuran 970×90. Maka sudah pasti kita harus melebarkan template kita agar bisa memasang iklan tersebut di bawah header. Karena pada umumnya ukuran template yang standar adalah 900px atau 930px saja.Seperti yang saya alami ini, saya baru saja melebarkan ukuran template blog kita ini.

Secara umum semua template memiliki teknik konstan, hanya ada sedikit perbedaan dalam beberapa pilihan. Jadi, dalam tip trik untuk mengukur dimensi model ini, saya mengutip saya dengan sangat sederhana dengan pasokan bahasa markup hypertext. Namun jika nakhoda menggunakan blogger model default tidak harus dipaksa untuk mengedit bahasa markup hypertext, betapapun masih cukup layout yang ada di dalam dasbor blogger semata.

Nah, saat ini kita cenderung untuk mulai dalam perjalanan menuju template model ukuran. Jika ada kenalan badan Perserikatan Bangsa-Bangsa tidak mengerti cara mengedit model blogger versi terbaru ini, silahkan scan di bawah awal.
 
 Kali ini saya akan share dan jelaskan gimana Cara Merubah Ukuran Halaman Template Blogger Terbaru, silahkan ikuti tutorial langkah - langkah berikut lengkap beserta gambarnya dengan mudah dan cepat buat sobat yang ingin mengubah ukuran template di blogger.
Berikut simak cara mengubah ukuran halaman blog:

Cara Merubah Ukuran Lebar Template Blog Agar Sesuai :


  1. Login akun blogger Anda. 
  2. Pilih Template > Edit HTML > klik Expand Template Widget
  3. Untuk menghindari kesalahan yang tidak diinginkan dalam mengedit, download terlebih dahulu template blog Anda. 
  4. Cari kode seperti dibawah ini untuk mengubah ukuran header: 
#header-wrapper{width:970px;margin:0 auto 0;height:60px;padding:34px 0px 34px 0px;overflow:hidden;} 
 Ganti ukuran header 970px sesuai dengan keinginan Anda.
Selanjutnya anda harus merubah semua ukuran 970px yang ada di sumber HTML template tersebut menjadi angka yang anda ingin ruhah semua. Caranya, ketik Ctrl+F, lalu masukkan angka 970 dan klik enter. Jika anda sudah tidak menemukan angka 970 berarti sudah oke.
 
  1. Cari kode seperti dibawah ini untuk mengubah ukuran lebar halaman:
    #outer-wrapper{width:970px;margin:10px auto 0px;padding:0;text-align:$startSide;font:$bodyfont;background:url( ... )
    Ganti ukuran lebar halaman 970px biasanya harus sesuai dengan header. 
  2. Cari kode seperti dibawah ini untuk mengubah ukuran halaman posting:
    #main-wrapper{width:485px;padding-top:10px;padding-left:0px;padding-right:0px;float:left;word-wrap:break-word;/* fix for long text breaking sidebar float in IE */
    Ganti ukuran halaman posting 485px sesuai dengan keinginan Anda. 
  3. Cari kode seperti dibawah ini untuk mengubah ukuran sidebar:
    #sidebar-wrapper{width:320px;float:left;padding-left:10px;margin-top:10px;margin-left:0px;margin-right:10px;word-wrap:break-word;
    Ganti ukuran sidebar 320px sesuai dengan keinginan Anda. 
CATATAN: Jika anda ingin mengembalikan ukuran seperti semula lagi, silakan ganti lagi semua angka yang anda rubah tadi seperti semula.
Ok gan sekian tutorial dari saya tentang Cara Merubah Ukuran Halaman Template Blogger Terbaru, semoga bermanfaat and happy bloging, see you next time. bye bye.. :v

10 Auto Ping Best Blog Site to Increase Blog Traffic

 
Accelerate Blog Posts Ping Indexed Search Engine.
As a blogger may already be familiar with the term blog ping. Ping blog is a tool to accelerate our blog indexed by search engines, usually when it updates the blog and then we pinged blog. Thus the new posts will quickly appear in the SE and generate traffic to our blog.

This blog pinging works automatically spread to many search engines, we just fill in the form provided, usually the column title of the blog, home page blog and RSS URLs. But not all of them support the RSS URL, only on certain sites that provide RSS URL. 

Now for more details, I suggest 10 Sites Best Blog Auto Ping based PageRank (PR) and Alexa Ranking (RA) , the following site:
  1. pingomatic.com  PR 7, RA 1131. Ping This blog is not foreign for bloggers, support to ping the RSS URL of the blog. 
  2. pingmyblog.com  PR 5, RA 5074. To ping your blog URL and RSS.
  3. pingoat.com  PR 5, RA 5748 . Support for the ping URL of the blog and RSS.
  4. feedshark.brainbliss.com  PR 5, RA 18 560. Support is also to ping RSS and podcasts.
  5. auto-ping.com PR 5 RA 22 930. To ping your blog URL and RSS. It's my favorite, how to install the widget on the blog so that allows us to ping after updating your blog with just one click. Examples like that attached my blog this.
  6. pingler.com  PR 4, RA 3325. To ping RSS must register, smentara ping blog URL can directly without a list.
  7. pingates.com  PR 4, RA 28 170. Just to ping blog URL.
  8. totalping.com   PR 3, RA 6153. Equally just as auto-ping.com Issuer. If this is a blog ping first and then install the widget.
  9. autopinger.com  PR 3, RA 26 071. Just to ping the blog alone.
  10. blogpingtool.com  PR 3, RA 50 210. Support for ping RSS, required to install code that has been given in the blog / web after pinging.
Preferably in pinging blog not too often, can be done once after we update the blog, if too often be considered spam by search engines filter, might get banned mbah Google.hehe.
Good luck, hopefully increasing traffic to your blog ...

Cara Mengetahui URL Feed ATOM RSS Blog Maupun Wordpress

Mungkin ada beberapa teman yang tidak tahu cara mencari alamat URL feed blog atau website anda? Padahal temanku lagi mencari, misalnya untuk tujuan mengirimkan. Bagaimana cara mengetahui sifat feed blog kita?

Cara Mengetahui Alamat Feed Blog sbb :

  1. Buka blog kita di browser Mozilla Firefox
  2. Lalu klik kanan disembarang halaman blog kita
  3. Klik "View Page Info"
  4. Akan muncul jendela pop up ( Lihat pada gambar 1 )
  5. Klik tab "Feed", 
  6. Nah di halam popup itu akan muncul URL feed blog sobat ( jika memang blog sobat mendukung script RSS feed, tapi biasanya untuk CMS umum, sudah disediakan script RSS feed nya )
  7. KLik pada salah satu URL feed yg ada
  8. Lalu copy dan simpan sebagai data jika suatu waktu diperlukan untuk submit RSS feed blog kita.
  9. Selesai 

Untuk pemakai browser lain : klik kanan pada halaman blog, lalu pilih "View Page Source"
Nanti cari aja URL yang mengandung Feed.

Kira2 seperti ini yg telah saya copy dari Source Html  (View Page Source):

Instan
URL RSS Feed untuk Blogspot : http://godscoin.blogspot.com//feeds/posts/default?alt=rss
ganti godscoin dengan nama subdomain anda.
URL RSS Feed untuk Wordpress : http://namadomain.wordpress.com/feed
Bagi yang masih bingung atau susah mencari URL feed blog / web selain blogspot / wodpress, bisa menggunakan service feedburner dari google (GRATIS). Caranya adalah sebagai berikut :

1. Kunjungi :  http://feedburner.google.com/
2. Login dengan akun Google anda
3. Masukkan URL blog/web anda pada kotak tersedia, lalu tekan next ( gmbr.1)

4.Jika CMS ( Content Management System ) blog anda menyediakan script RSS feed , maka dihalaman berikutnya akan otomatis muncul URL feed blog anda.Tapi jika tidak ada script RSS feednya , maka Feedburner akan memberitahu bahwa feed blog anda tidak ada, dan tdk valid. ( Lihat Gmbr.2 )
Dalam kasus ketika saya mencoba mengirimkan URL: http://godscoin.blogspot.co.id, FeedBurner mengatakan bahwa tidak ada URL feed yang valid di web ikalnbaris itu, dan memang saya belum memasang script rss feed-nya.

Tapi ketika saya mencoba memasukkan subdomain http://godscoin.blogspot.co.id, maka feedburner langsung
mengusulkan URL umpan baru dengan nama: http://feeds.feedburner.com/QuickJumpNews (Lihat Gmbr.3)


5. Untuk blog dengan blogger CMS (blogspot), karena disediakan dua jenis feed URL, maka oleh feedburner nantinya kita akan diberitahu untuk memilih yang mana? Siapa ATOM atau siapa RSS? Pilih salah satu yah .. sama aja sama kok, itu sama-sama untuk menampilkan update blog terbaru. (lihat gmbr.4)


Terimkasih agan agan karena telah menyimak artikel tentang Cara Mengetahui URL Feed ATOM RSS Blog Maupun Wordpress bye - bye see you next post..

Cara Mengganti "Older Posts" Dengan Angka Di Blog

 (gambar di atas merupakan contoh)
1. Langkah awal tentu saja harus menuju ke desain template anda kemudian ke "Edit HTML"
2. setelah itu cari kode ini ]]></b:skin> kalo sudah ketemu taruh script dibawah ini sebelum kode tersebut

.showpageArea a {
text-decoration:underline;
}
.showpageNum a {
text-decoration:none;
border: 1px solid #cccccc;
margin:0 3px;
padding:3px;
}
.showpageNum a:hover {
border: 1px solid #cccccc;
background-color:#cccccc;
}
.showpagePoint {
color:#333;
text-decoration:none;
border: 1px solid #cccccc;
background: #cccccc;
margin:0 3px;
padding:3px;
}
.showpageOf {
text-decoration:none;
padding:3px;
margin: 0 3px 0 0;
}
.showpage a {
text-decoration:none;
border: 1px solid #cccccc;
padding:3px;
}
.showpage a:hover {
text-decoration:none;
}
.showpageNum a:link,.showpage a:link {
text-decoration:none;
color:#333333;
}


3. setelah itu cari kode ini </body> kemudian taruh script dibawah ini sebelum kode tersebut.


<!--Page Navigation Starts-->
<b:if cond='data:blog.pageType != &quot;item&quot;'>
<b:if cond='data:blog.pageType != &quot;static_page&quot;'>
<script type='text/javascript'>
var pageCount=5;
var displayPageNum=5;
var upPageWord =&#39;Previous&#39;;
var downPageWord =&#39;Next&#39;;
</script>
<script src='http://bloggergadgets.googlecode.com/files/blogger_pagenavi_min.js' type='text/javascript'/>
</b:if> </b:if>
<!--Page Navigation Ends -->
4. Save

How To Increase Alexa Rank Fast


Understanding Alexa Rank | What is Alexa Rank?

Alexa rank is one indicator of the popularity of a site and also often used to assess the quality of a site, sites that have high quality in terms of content, backlinks and traffic will have a small Alexa rank, for example: google.com (Alexa rank # 1) , facebook.com (Alexa rank # 2).Techniques Proven To Quickly Increase Alexa Rank
Below are some ways / techniques to increase Alexa rank that has been proven to increase Alexa rank quickly.Claim Your Site On Alexa Site
Claim Your Site, to increase Alexa ranking before you have to register and claim your blog / website first and put Alexa ID Meta tag on the head in your template, then Alexa will make easier access your site. Site description, country name and profile are very important when claiming. Always use keywords in accordance with the theme of your blog when describing your site, although it is a small thing but very helpful to increase Alexa ranking on your blog.Install Alexa Toolbar On Browser
Installing / Installing Alexa Toolbar in your browser is something you must do to increase Alexa rank. You must update your blog using a browser that has been installed Alexa toolbar, all the activities you do on your blog must use the same browser and already installed Alexa toolbar.Update Blog Content Regularly Fast Increase Alexa Traffic Rank
Regularly updating your content on your blog is a great way to increase Alexa rank, Alexa loves fresh content as well as Google. I once read on a famous site that updating blog 7-10 times a week will very quickly increase Alexa rank.Quality Content
Alexa also considers page views, bounce rates, when ranking your site. Unique and fresh content will make your blog visitors will feel at home on your blog, create content that is always in accordance with the theme of your blog, content that does not match the theme of the blog will affect negatively for ALexa rank and very harmful.Link Building
Alexa also calculates links, link collection or backlinks that lead to your blog will also make Alexa rank increased, many ways to get backlinks such as social bookmarking, link exchange, guest blogging, forums, etc.Blog Commenting
You should be aware that most of the blogs have NoFollow attributes in their comment system, It does not help to improve Google pagerank. And, if you comment on blogs aggressively for the long term then you may be a victim of mass spam by Google. Do not be afraid, you believe it or not, Google search engine is always looking for intentions. If you post constructive comments by using keywords wisely, then Google will send a positive signal and help you to increase Alexa rank.Special Content for Webmasters
Almost all webmasters and blog owners use the Alexa toolbar in their browser, and if you write a special post for them with optimized search engine optimization then your Alexa rank will increase very quickly because they will visit your blog with their browser that has been installed Alexa toolbar. little examples of content for webmasters such as discussing about SEO, Blogger, how to modify website / blog, etc ..Alexa Pro
If you are a blogger who is serious about blogging and gain profit in the blog world, it would not hurt you to try and buy Alexa Pro, in addition to increasing Alexa rank quickly, you can also enjoy features more than ALexa like promoting your website on Alexa search results, add a company logo, link back to your site, etc. If you are blogging just a hobby like me this is better choose Alexa free course.

Cara Ampuh Agar Artikel Blog Cepat Terindex Google - Yahoo - Bing

Kirimkan Sitemap ke program Google / BingPeta situs mungkin merupakan daftar isi yang menjelaskan apa yang ada di buku harian / situs web Anda, peta situs di sini bukan daftar isi karena tampaknya di halaman namun merupakan peta situs XML, XML mungkin merupakan bahasa yang hanya dipahami oleh mesin pencari. Bagi pengguna Wordpress akan menghasilkan sitemap dengan plugin, dan untuk pengguna ukuran pengguna Blogspot biasanya sudah terintegrasi, seperti pada contoh di bawah ini.

http://bloggerpeer.blogspot.com/sitemap.xmlhttp://bloggerpeer.blogspot.com/atom.xml?redirect=false&start-index=1&max-results=500http://bloggerpeer.blogspot.com/feeds/posts/default?orderby=updatedKirimkan sitemap anda ke Google Webmaster Tools, agar Bing / Yahoo bisa mengikuti Bing Webmaster Tools

Link Building Untuk Post Cepat Indexed Search EngineUntuk cepat terindeks Anda harus membangun link ke halaman posting Anda, jangan hanya mencari link yang menyebabkan homepage semata-mata, carilah link dofollow yang menyebabkan konten Anda. itu juga akan membuat buku harian Anda modis dan dapat dipercaya di mata search engine, mesin pencari seperti Google square measure sangat senang dengan buku harian / net yang memiliki link dofollow yang relevan yang menyebabkan halaman blog dan Google PageRank Anda bisa mendapatkannya.

Cara Cepat Melihat Google Dengan Social Bookmarking / Social MediaSalah satu berkat yang sangat cepat untuk mendapatkan catatan harian Anda yang diindeks oleh mesin telusur adalah membagikan konten Anda di situs media sosial atau bookmark sosial yang beberapa ditemui akhir-akhir ini seperti Google+, Twitter, Facebook, Linkedin, Pinterest, dan lain-lain. Selain itu, buku harian Anda akan mendapatkan lalu lintas dari situs media sosial
Menghubungkan Internal Di buku harian / situs webJika Anda menginginkan sebuah halaman baru di situs web Anda untuk diindeks dengan cepat, maka tautan internal akan sangat membantu. Sebutkan halaman baru Anda dengan link teks anchor, dan perbarui halaman yang diindeks sebelumnya dengan link ke halaman baru Anda (pastikan diskusi konten Anda sebelumnya sesuai dengan konten baru Anda).
Menghubungkan situs Anda tidak ada di sekitar membangun backlink eksternal. itu juga diperlukan untuk membuat tautan di antara {website | web site web} Anda (tautan internal) yang akan mendorong mesin telusur mengenai adanya konten terbaru di situs Anda.
Ping situs web / buku harian untuk keputusan Google / Bing spiderPing pada awalnya merupakan cara bagi blogger untuk memberi tahu mesin pencari pada konten baru di blog mereka. Namun, itu berevolusi dimanapun setiap orang akan menggunakannya untuk memperbarui blog bukan hanya blog namun juga situs kuno
Ping mungkin merupakan sarana yang sangat berguna untuk memperingatkan mesin telusur dan direktori untuk pembaruan konten Anda.Ada ukuran persegi beberapa situs layanan ping on-line yang dapat diakses. sejumlah yang paling sederhana yang saya tahu adalah:
pingoat.com
pingler.com
pingomatic.com
Komentar Di buku harian Untuk program cepat IndexedBlog dengan pembaca aktif dan sebagian besar konten terbaru akan sering dijelajahi oleh mesin pencari, dengan mengomentari blog semacam itu maka Anda akan mendapatkan dampak dari kualitasnya dan bisa membuat halaman Anda terindeks dengan cepat. mencoba untuk menanyakan posting baru-baru ini di blog yang terkenal dan sangat hierarkis, ini sering merupakan ucapan terima kasih yang sangat efektif untuk mendapatkan halaman baru yang terindeks dengan cepat dan memastikan bahwa Anda hanya menggunakan halaman yang ingin diindeks sebagai situs web Anda pencari sumber daya universal sekali komentar tidak hanya homepage, saja.
Update Konten diary / situs web Artikel seringPastikan Anda memperbarui situs web Anda sering, konten atau artikel kontemporer sangat penting untuk menginduksi halaman baru yang diindeks. Jika konten / posting di lapangan harian Anda berukuran basi maka mesin pencari tidak akan sering merangkak diari Anda. Di sisi lain, jika Anda menyimpan buku harian Anda yang kontemporer dan diperbarui (meskipun mengubah halaman indeks) maka spider program dapat terus kembali. karena alasan mengapa beberapa buku harian memiliki peringkat yang masuk akal dan ukuran kuota mereka yang terindeks dengan cepat tidak ada yang terlepas dari hasil pemilik blog yang biasanya memperbarui situs web mereka dengan konten kontemporer atau postingan.

Gaya Ramah Ponsel dan Responsif

Tak bisa dipungkiri sekali lagi, pengguna perangkat smartphone dan pil saat ini melebihi komputer komputer pengguna dan komputer laptop, maka perlu bagi negara Amerika Utara saat ini untuk mengubah panduan terdahulu agar responsif dan mobile friendly agar tamu World Health Organization mengunjungi web kami. Situs / buku harian tidak sulit untuk memindai konten ada di buku harian kami, apalagi saat ini Google telah menerapkan peraturan algoritme MOBILEGEDDON yang mengharuskan bangsa Amerika Utara membuat situs web / buku harian yang ramah seluler dan setelah semua ini dapat berdampak besar pada SEO "qtiperar" title = "terutama - terutama" id = "tip_191"> terutama penelusuran seluler. oleh karena itu untuk ukuran kuota Organisasi Kesehatan Dunia Anda masih menjadi korban panduan sebelumnya silahkan ditingkatkan agar bisa mobile friendly dan dengan cepat terindeks Google, beber

how to Create a Text Box Copy Paste On Article in blog

All you have to do is just input the script code below

 
<div> <form name = "copy"> <div align = "center"> <input onclick = "javascript: this.form.txt.focus (); this.form.txt.select ();" type = "button" value = "Copy All" </ div> <p align = "center"> <textarea style = "widht: 150px; height: 50px" name = "txt" rows = "35" wrap = "virtual" cols = "25"> Try Copy All All Text in Print Script Width </ textarea> </ p> </ div> </ form>

    
You can change the text that is marked with red that you want.
Create a new entry, then click on the HTML section instead of Compose.Enter the code above. If you've returned the position on the Compose tab and you live input script any code that will be saved.
Easy is not it. Immediately live practice ya.Ohya here is a little description for the script code text box it. (If you guys want to change some of his texts)

SCRIPTT TO MAKE COPY ALL BUTTONS

 Script <form name = "copy"> in general, the form serves to accommodate elements that will be input into an object. The element is named copy function.
    
<div align = "center"> is an element used to set the position, web layout / blog you create, and the div tag function here set the Copy All buton position in center "center" for other positions left "left" and right "right"
  
<input onclick = "javascriptt: this.form.txt.focus (); this.form.txt.select (); that means when the Copy all button is clicked then all the contents on Box Text Area will be blocked and everything is solved, it is the main print of Java Script Buton Copy All, is expected to not be deleted by you.
    
value = "Copy All" is a writing contained in the middle of the buton / Copy All button, this paper you can replace with any posts you want.

SCRIPT TO MAKE BOX TEXT AREA FOR SCRIPT


<textarea style = "widx: 150px; height: 50px" name = "txt" rows = "35" wrap = "virtual" cols = "25"> please write your script as you like </ textarea> This script is in use to create Box Text Area Script with Copy All.
    
style = "widht: 150px; this is for the width, this size you can customize for example 500px or the other in customize to your requirement.So also for height height: 50px" can be adjusted.

Cara Mudah Mengganti Logo Blog di Blogspot

lihat logo blog berikut contoh berikut:
Seperti yang terlihat, setiap situs ataupun blog memiliki logo yang beragam dan bisa kita lihat dengan mudah di Tab aplikasi yang kita gunakan untuk berinternet. logo yang saya gunakan sendiri seperti yang terlihat, sebuah lingkaran merah bertuliskan huruf M besar ditengahnya.

Cara 1
Masuk ke akun blog Kita.
Masuk ke Tata Letak atau Lay Out
Lalu edit Favicon di Bagian atas.


Cara 2
Masuk akun blog Kita
Masuk ke bagian Template
Lalu Pilih Edit HTML
Cari teks


<title><data:blog.pageTitle/></title>

<b:skin><![CDATA[ 

Lalu masukan Script berikut di antar keduanya :
Ganti Warna Biru dengan URL Gambar yang akan kita jadikan logo.

<link href='https://blogger.googleusercontent.com/img/b/R29vZ2xl/AVvXsEgeB-o-9ahyphenhyphenlpKST4ORI0HywcSOX0cE2-nXt1om-3POBE6ovYreyEApVfnrCASkj0_BURkg1mZ_boBAIKNxoPSQTgALA0DgctkPLKOhOBrxxq5tQ3rLC0HQnZhNYUcW9lemOeJCpeHnFMqp/s48/R.gif' rel='shortcut icon'/>

Sehingga kurang lebih Menjadi :

<title><data:blog.pageTitle/></title>
<link href='URL GAMBAR' rel='shortcut icon'/>
<b:skin><![CDATA[ 

Sekali lagi, Biasanya logo blog kita tak akan langsung berubah dengan cepat, tapi membutuhkan waktu beberapa hari.
 
Selesai.. Horee semoga postingan ini bermanfaat terima kasih..

How To Create Button Button Button Social Media Cool In Blog Or Website

image source: http://www.brickmarketing.com/wp-content/uploads/2011/11/why-you-need-to-add-social-share-buttons-now.jpg

1. Please login to ADDTHIS website.
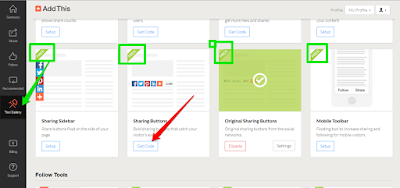
2. Select SHARING BUTTONS.
3. Then, choose the desired form of sharing button. There is available Pro and Free. This means there are paid and some are free.
4. Please press the free or pro button accordingly.
5. Login with google or facebook friend for quick.
6. After that popup appears, please set yourself and take the code in GET THE CODE.

 
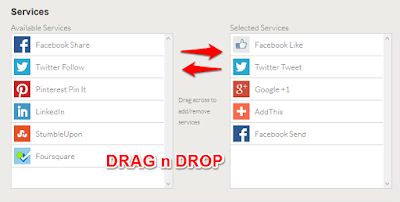
 7. After you hit the 'get the code' button, it will show costumization. Please drag (share) the share button you want to install in accordance with the tastes of all friends.
 

8. Put the code obtained in the HTML / Java Script blog friends in layout / layout. 
9. Remember, do not forget to press the active button under the code get the code.
    If Godscoin's friends feel lazy to register and login to an addthis site, just be quiet, friends still have a chance to use the buttom share button. Companions simply copy the code below and place it on the blog template friends. Where is it? Position is usually before the related post.

    <!-- AddThis Button BEGIN -->
    <div class="addthis_toolbox addthis_default_style">
    <a class="addthis_button_facebook_like" fb:like:layout="button_count"></a>
    <a class="addthis_button_tweet"></a>
    <a class="addthis_button_google_plusone" g:plusone:size="medium"></a>
    <a class="addthis_counter addthis_pill_style"></a>
    </div>
    <script type="text/javascript">var addthis_config = {"data_track_addressbar":true};</script>
    <script type="text/javascript" src="//s7.addthis.com/js/300/addthis_widget.js#pubid=ra-5156a09e76c1568f"></script>
    <!-- AddThis Button END -->
  

The way above is fairly easy and fast. However there are drawbacks. Disadvantages of the above is a friend can not see the analysis features provided addthis, such as the number of shares, traffic from social media, and so forth.

Disclaimer

<=======|xxx HANYA ORNAG YANG MEMBEKU DALAM DELUSI xxx|=======>